

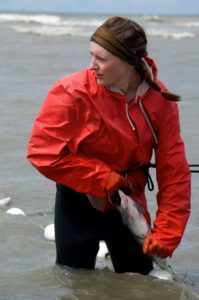
photo by Erin Ranney
I spend my summers working as a commercial fisherman in the waters of Bristol Bay. We live for 6 weeks in a cabin with no electricity or running water, our days and nights governed by the rising and falling of the tides. It’s a hard way to make a living, but it fills me with a sense of purpose. That little stretch of beach in remote Alaska is a part of who I am; it has taught me determination, strength and shown me the potential of which I am capable.
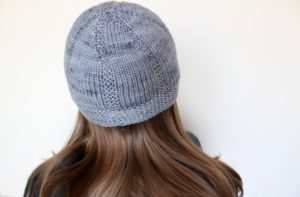
In a place where the average temperature in June is 48°F, hats are an essential part of our wardrobe. Sometimes you need a no-nonsense hat that works as hard as you do. That’s why I designed The Fisherwoman Hat. Inspired by the women who make their livelihood fishing the waters of Alaska, this is a hat made for function and wearability. The simplicity of the design makes it a perfect project to highlight a hand dyed or tonal yarn. I’ve tried to make this hat as beginner friendly as possible, please contact me if you have any questions!
What you’ll need:
Yarn
100g worsted weight yarn. Sample was knit with Farmers Daughter Fibers Squish Worsted Superwash in the Castle Rock Color.
Needles
US 7 16” (or longer) circular needle or long straight needles
US 8 16” circular needle
US 8 DPNs, or US 8 32” circular for Magic Loop
Notions
Stitch marker, Tapestry needle
Gauge
18 stitches = 4” in broken rib pattern with larger needles after blocking.
Abbreviations
CO – Cast on
K – Knit
P – Purl
K2tog- Knit two stitches together
Notes
The sample hat fits snugly on a 21” head. For a relaxed fit or larger hat, go up a needle size.
Directions
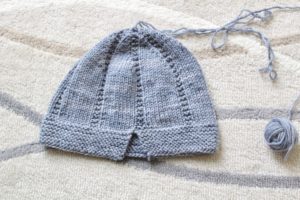
Brim
The brim of the hat is worked flat before joining in the round for the body. If you prefer to work the brim in the round, simply alternate knit and purl rows until you reach the desired length.
CO 88 stitches using the German Twisted Cast On, leave a long tail to seam your edges later.
Knit in garter stitch (knit every row) until work measures 1.5” – 2” (depending on preference, sample hat has a 1.5” brim)
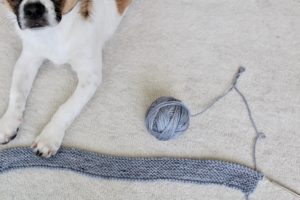
Optional: have a puppy friend help you with this step.
Broken Rib
Switching to larger needles, join in the round being careful not to twist your stitches! Place stitch marker to indicate beginning of round.
Row 1: K 9, P 2 Repeat to end of round.
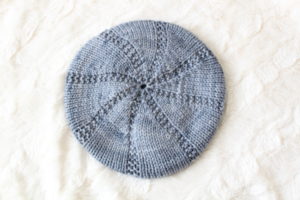
Row 2: K all stitches
Repeat rows 1 and 2 until work measures 5” (For a slouchy hat, knit to 6”)
Decreasing
Row 1: K2tog, K to established rib, P2 Repeat to end of round.
Row 2: Knit all stitches
Repeat rows 1 and 2 eight times, switching to DPNs or Magic Loop when needed. 24 stitches remaining
Next row: K2tog, P1 Repeat to end of round. 16 stitches remaining
Cut yarn, using a tapestry needle thread through remaining stitches and pull just tight enough to close the hole.
If you worked the brim flat, seam the garter edges together. I found this tutorial helpful to make an invisible seam.
Weave in ends and block.
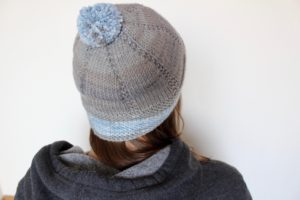
Pom-pom hat made with HiKoo Simpliworsted in Earth and Sky
Embellish as you wish! Add a pom-pom (see my post about my favorite way to make DIY pom-poms), buttons, flowers, pins, whatever you desire!
Tag your photos @ranneyknits and use #ranneyknits on Instagram!


Sujata from India
Thanks for sharing, wonderful pattern, I wish to make this hat for my sister.
Justine
I’m so glad you like it!
Martha
Thank you! I wanted a pattern for my hand spun yarn. I think it will look good.
Justine
I would LOVE to see it knit with hand spun! I think it would look amazing! ❤️
mama
That’s one setnetter I wouldn’t mess with! Nice hat!